Nest.Js 參數由資料庫讀取
前言
最單純直覺取得參數的方式,就是寫在env檔
而Nest.Js官方也提供了config module可以直接使用
優點是快速、簡單,缺點就是需要異動參數時,就得重啟服務了
有些偏業務面使用的參數,平常不太會異動
但又希望可以做成頁面讓user自行管理,達到不必透過重啟服務的話
將其保存在資料庫是最方便的事了
但有些參數是服務初始化時就要先用到的該怎麼做呢?
就需要配合Nest.Js的生命週期來處理了!
Nest.Js life cycle
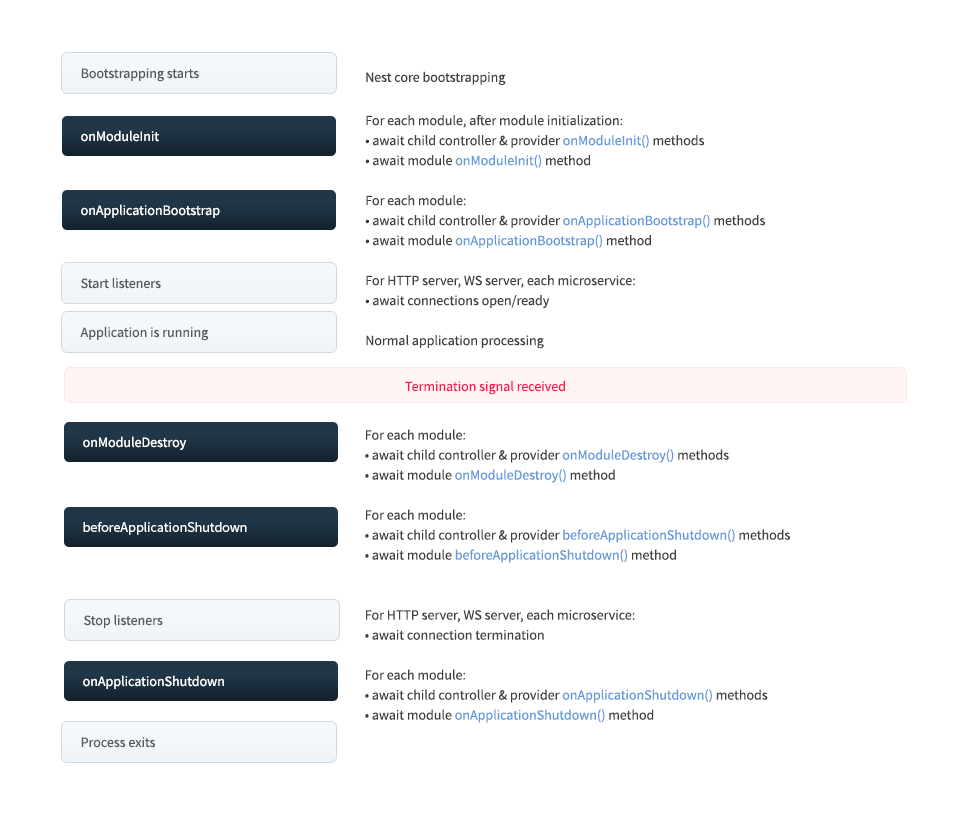
由上圖可見,Nest.Js提供了OnModuleInit、onApplicationBootstrap,可以在服務啟動前先取得參數
相信從名字就可以直接理解用途了!
像port、token等最底層的參數,我仍是使用env來處理
因為這些一旦有異動需求,通常都要開發人員協助處理,無法讓user自行處理
而參數日常業務使用量大,也不適合每次都從資料庫重新取得
故直接存在memory裡
提供api供前端異動,再輔以interceptor
當參數異動後,除了DB寫入參數之外,同步將新的參數更新至memory裡,以維持日常業務的高效使用
直接看程式碼
程式碼
@Injectable()
export class ConfigService implements OnModuleInit {

    private readonly logger = new Logger('config');

    private dbConfig: ConfigEntity[] = []; // 將參數清單儲存在memory,便於業務直接取用,不必一直反覆撈資料庫

    constructor(@InjectRepository(ConfigEntity)
                private readonly repo :Repository<ConfigEntity>) { }

    /**
     * 服務初始化時,透過Nest.Js life cycle,先行載入參數
     */
    async onModuleInit() {
      this.dbConfig = await this.repo.find();
      this.logger.log(`-------------Initialized Database Config-------------\n` +
                      `${inspect(this.dbConfig, false, null, false)}\n` +
                      `-----------------------------------------------------`);
    }

    /**
     * 給其他service取得參數使用
     * @param id 參數ID
     * @return 參數值
     */
    get(id: string) : string {
        const value = this.dbConfig.find(c => c.id === id)?.value;
        if (value) {
          return value;
        }

        this.logger.error(`查詢${id},記憶體內查無資料!以下為目前記憶體內的資料`);
        this.logger.error(inspect(this.dbConfig, false, null, false));
        throw new InternalServerErrorException(`config查無「${id}」參數!`);
    }

    /**
     * 前端異動參數後,供interceptor更新記憶體資料
     * @param config
     */
    updateConfig(config: ConfigEntity): void {
        const index = this.dbConfig.findIndex(c => c.id === config.id);
        if (index === -1) {
          this.logger.error(`更新記憶體資料失敗!查無${config.id}!以下為目前記憶體內的資料`);
          this.logger.error(inspect(this.dbConfig, false, null, false));
          throw new InternalServerErrorException('更新記憶體資料config失敗!請查閱config log檢視相關資訊');
        }

        this.dbConfig[index] = config;
        this.logger.debug(`更新記憶體資料成功!${config.id}=${config.value}`);
    }
}
以下順便提供interceptor,供參考
@Injectable()
export class UpdateLoggerInterceptor implements NestInterceptor {

  private readonly logger = new Logger('config');

  constructor(private readonly configService: ConfigService) { }

  intercept(context: ExecutionContext, next: CallHandler): Observable<any> {
    const ctx = context.switchToHttp().getRequest();
    const user = ctx.user as UsersEntity;
    const userIp = ctx.headers['x-forwarded-for'] || ctx.connection.remoteAddress;

    const updateId = ctx.params['id'];
    const beforeUpdateValue = this.configService.get(updateId);
    return next.handle().pipe(
      tap((response: ConfigEntity) => {
        this.logger.log(`[${userIp}] [${user.username}-> ${user.name}] 更新參數:${updateId}:${beforeUpdateValue} -> ${response.value}`);
        this.configService.updateConfig(response);
      }),
    );
  }
}
心得
我的專案是在Nest.Js官方提供 config module 以前就建立完成的
當時官方教學,config讀env檔,是直接寫在constructor裡
又以服務上線為主,並沒花太多心力在處理底層,直接官方文件Copy就先用了
所有的參數都寫在env,只要有異動就要重啟…
服務穩定後,想要把業務參數放給user自己維護
希望能異動後立即生效、不必中斷服務
於是開始了這次的改寫工程
而JavaScript 的 constructor 無法執行async, await的異步函式
所幸有life cycle,可以很輕鬆地在服務完全啟動前載入參數
再配合interceptor同步更新記憶體資料,不必花費太大心力,就改寫完成